This tutorial will show you how to create new and edit existing
button links. Buttons are used as a more attention-grabbing way to link to web
pages, documents, forms, and email
addresses.
Button examples

Choose learning method:
Video Tutorial: How to create a
button
link
Time: 2:52
Closed
Captioning Available:
Yes
Text Tutorial: How to create or edit
a button link
If you want to link to an uploaded PDF, start with Step 1.
If want to link to a web page, skip to step 2.
STEP 1: Upload & copy your document's URL
1. In the dashboard, you have
two options to access existing media
or upload new media files like PDFs
and images.

- Click Media > Add New to
upload new images and PDFs.
- Click Media > Library to
view/search for existing images and
PDFs.
2. After the file has been
uploaded, select the
file and copy the
document's URL. The full file
URL will always start with "https://assets.campbell.edu/"

3. Next, find the page where
the
button
will be added, and click Edit.
STEP 2: Create a new
button
1. While in page edit mode, hover
over
the shortcode
icon. Click Button.

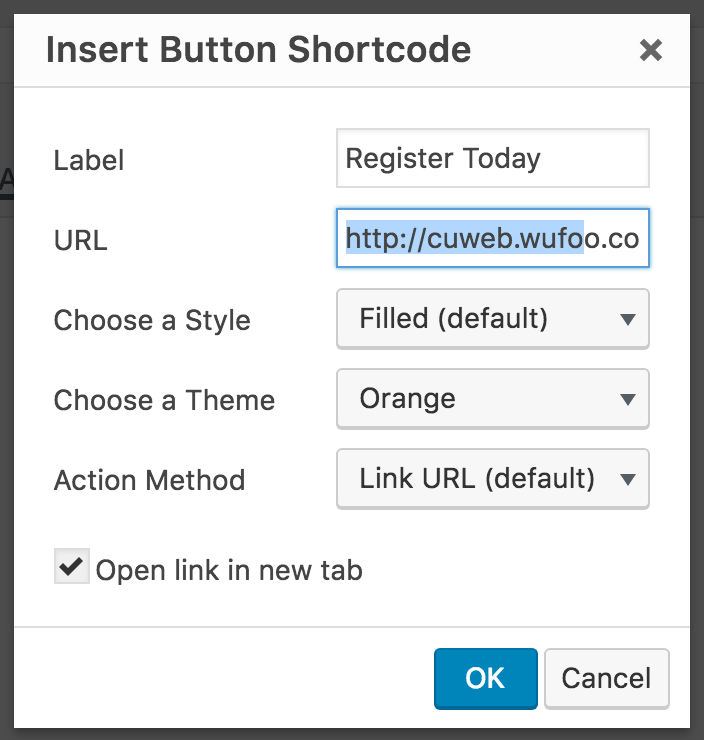
2. Make your selections in the
"Insert
Button Shortcode" options and click OK.

| Button Shortcode
Field | Description |
| Label | Add text to display
in the
button. We suggest
call-to-action phrases with no
more than 5 words. Example: "Download the
Student
Handbook" |
| URL | Add the URL for the
web page or document. You must
include http:// or https://. Example:
https://www.campbell.edu |
| Choose a Style | Select Filled
(default) and Ghost. We suggest you
select Filled for content
pages. If adding two buttons
side-by-side, it's fine to use
different styles to emphasize
which button is most important
such as the Filled (left) and
Ghost (right) buttons
below:  |
| Choose a Theme | Select a color for your button.
The options are Orange, Black or
White. Orange is the default
option. |
| Action Method | Leave as Link URL (default). |
| Open link in new tab | Check this box if your button
link goes to an external site
or PDF documents. Examples: PDF
forms, Wufoo form links,
registration links, links to
non-campbell.edu
websites. |
3. After you click OK,
the button
shortcode is added
to your
page.

4. Click Preview (Preview
Changes) to test how the button
appears and works on your page.


5. Click Update when
you are ready to save and publish the
updates.

Notes on Updating an
Existing
Button
When you need to update a
button on a page, it's highly
suggested that you simply delete the
existing button, then create a new
one. However,
if you want to swap out
the links in an existing
button you
MUST follow the exact
steps below to get the button to work as
expected.
1. Delete the
old URL from the
shortcode.
EXAMPLE
[button label="View the Academic Calendar" url="http://www.campbell.edu/old.pdf"
style="" theme="" action="" new_tab="true" ]
2.
The URL space should be
empty.
EXAMPLE
[button label="View the Academic Calendar" url="" style="" theme="" action=""
new_tab="true"]
3. Paste the new file URL
into
the shortcode.
EXAMPLE
[button label="View the Academic Calendar" url="http://www.campbell.edu/new.pdf"
style="" theme="" action="" new_tab="true" ]
4. Click
the Update button to
save the
changes.

